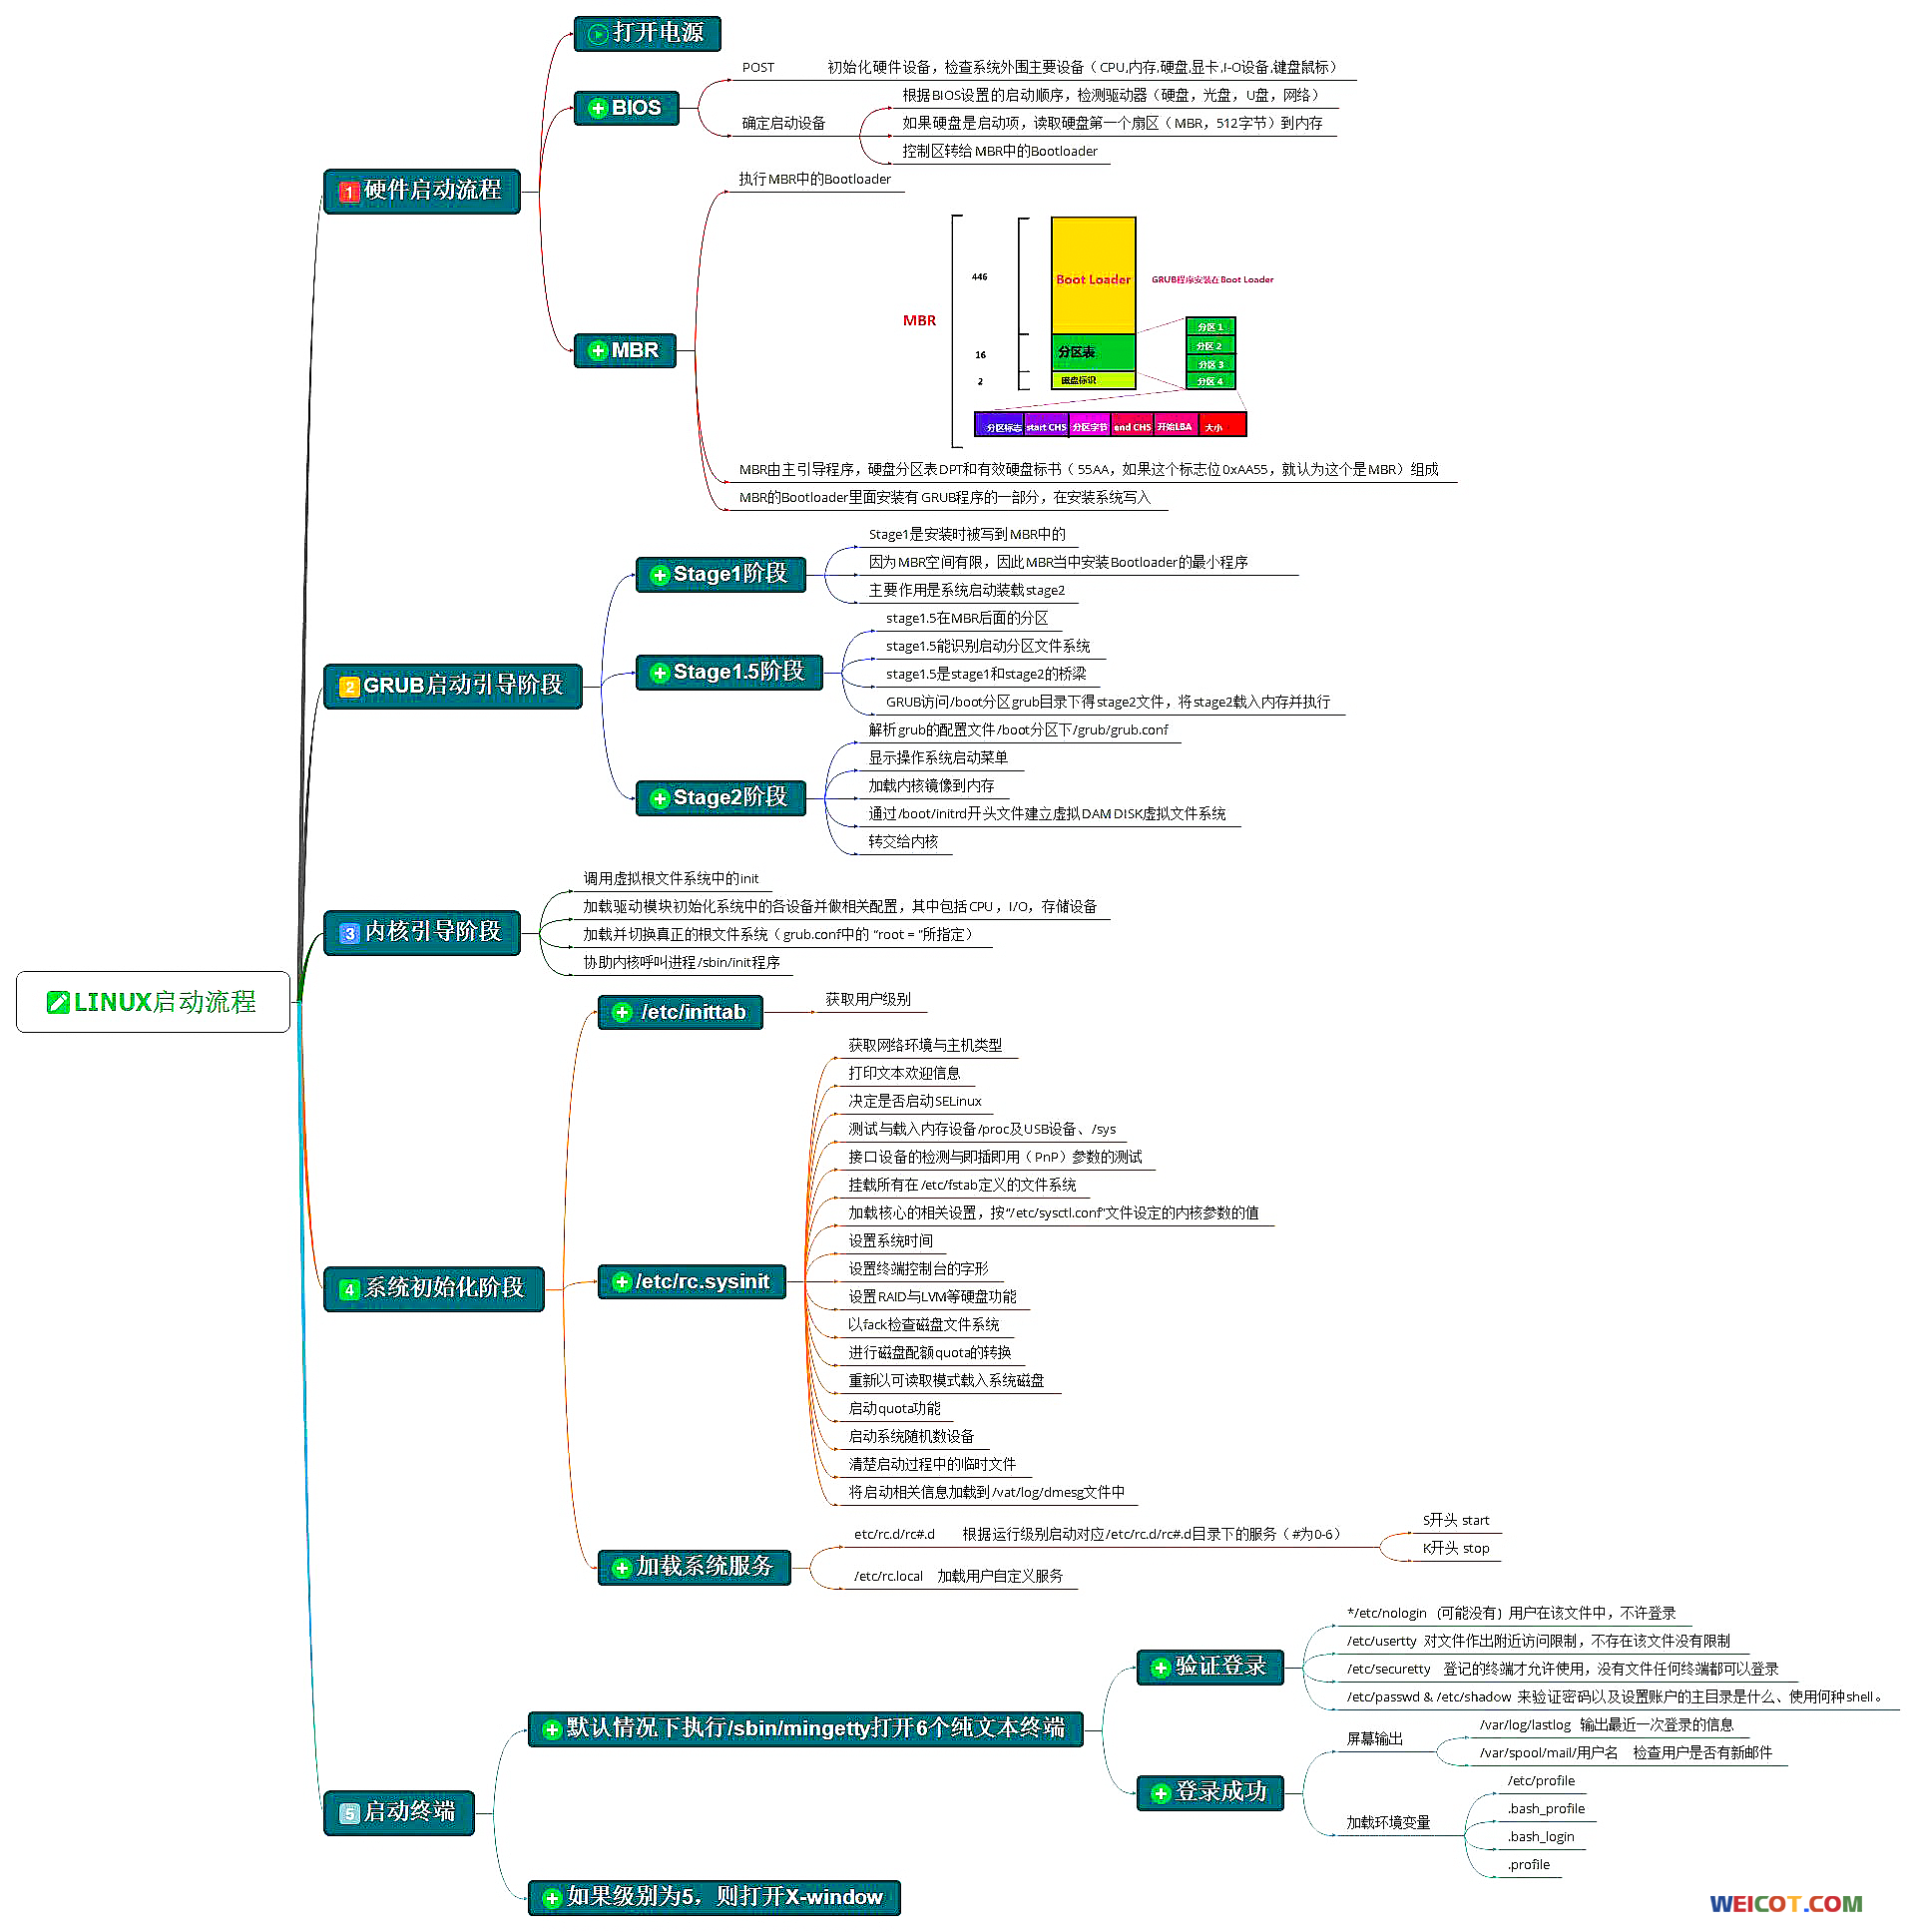
发生原因
由于运维小哥 误操作吧内部用的服务器当测试打算重装 然后发现不对就终止了操作
然后它自己尝试通过百度的答案进行恢复的时候把boot和引导分区都给删了发现问题大发了
过来问我怎么办当时我是主要负责项目和开发这一块 由于内部服务器上至少有 10 万多张超清设计和几百万个产品数据
以及其他重要数据 而且备份原公司也没做这个问题就比较严重了
运维小哥把硬盘给我后我用DiskGenius发现就只有一个 lvm 分区
像什么引导 和启动 也就是boot 分区里面有linux 内核都给删了 硬盘使用的是gpt分区
注:此教程只包含恢复方式和需要用到知识但是没有包含很多具体细节所以不适合新手 操作前请先备份 或在专业人士指导下操作
1.读取lvm中的数据(备份未被损坏的数据)
1.1读取硬盘内容方法一 (要恢复系统和恢复数据)
1.通过UltraISO 刻录一个centos 安装u盘
2.刻录完成后电脑关机插上u盘选择重启
3.进入开机画面时按F11 进入启动菜单对话框
4.选择你刚刻录好的那个U盘启动
5.进入到centos 的 启动选择框
6.选择Troubleshooting
7.选择Rescue a CentOS system
8.选择Continue (字符界面选择 1 有UI 的可通过方向键选择 ) 回车
9.一直回车直到出现 shell 界面 (如果你有多个安装centos的系统盘的话可能回让你选择需要进入的系统)
注:centos 的 vg name 必须为centos 否则 Troubleshooting 模式将识别不到你的系统盘
10.进入恢复系统后你需要恢复的centos 系统盘被自动挂载到了 /mnt/sysimage 下
11.挂载一个新的硬盘先备份出需要恢复的盘里面的数据
注:1.数据库等可以通过 数据库文件进行恢复
1.2读取硬盘内容方法二 (只恢复数据)
挂载在另一个centos 系统中 当然你运气好的话 lvm 为被损坏的情况下
通过命令 pvs 你可以看到 一个重名的 centos 分区 重命名待恢复的硬盘 vg name 挂载即可
你只需要通过如下操作在其他使用lvm centos 下 挂载这块有lvm 分区的硬盘
linux 挂载普通硬盘或者LVM 以及挂载其他linux系统的lvm
注:数据等可以通过 数据库文件进行恢复
配置安装源,以及如何配置网络
1.默认你已经进行了上面的 1.1 的操作
1.1 方法一使用网络安装源
注:如果你主机的网卡系统不能识别 你可以使用usb 网卡 那玩儿免驱 或者重新安装驱动
配置临时网络(因为U里面的系统, 重启即失效)
1.通过ip addr 获取网络接口名称
2.配置IP,注意网卡名称(可以配置主机正常运行时候的IP地址,本机IP是192.168.3.5)
命令:
#ipconfig ens2 192.168.3.5/24
#ipconfig
2.添加默认路由(这时候只能同网段主机互通,无法连接互联网;192.168.3.1是网关地址)
#ping 114.114.114.114
#ip route add 0.0.0.0/0 via 192.168.3.1 dev ens2
#ping 114.114.114.114 // 这时候你就能ping 通了
3.配置DNS(这时候可以ping通IP,但是无法ping通域名,所以需要添加DNS,并将dns配置生效)
#nmcli con mod ens2 ipv4.dns “114.114.114.114”
#nmcli con up ens2
如果上面的方法报错的话 比如 interface “org.freedesktop.DBus.ObjectManager” doesn’t exist 等
说明系统的nmcli 暂时不能用
方法二
手工修改 /etc/resolv.conf
nameserver 114.114.114.114
nameserver 8.8.8.8
注:你NetworkManager.service 有开启的话还需要配置这个 不过一般在恢复模式下不需要配置这个
修改 /etc/NetworkManager/NetworkManager.conf 文件,在main部分添加 “dns=none” 选项:
[main]
plugins=ifcfg-rh
dns=none
NetworkManager重新装载上面修改的配置
# systemctl restart NetworkManager.service
4.通过 chroot /mnt/sysimage 将root 目录切换到需要恢复的centos 系统
注:执行完后你可以通过 df-HT 查看挂载情况
5.这时候你ping 一下 www.weicot.com 如果ping不同 ping ip 能通的话那么你需要重新配置一下DNS
6.配置centos 7 国内源
mv /etc/yum.repos.d/CentOS-Base.repo /etc/yum.repos.d/CentOS-Base.repo.backup
2. 下载阿里云的CentOS-Base.repo 到/etc/yum.repos.d/
wget -O /etc/yum.repos.d/CentOS-Base.repo http://mirrors.aliyun.com/repo/Centos-7.repo
3.清理缓存
sudo yum clean all
4. 生成新的缓存
sudo yum makecache
1.2 方法二使用本地安装源
1.变更根目录”chroot /mnt/sysimage/” 并挂载你的U盘 ” mount /dev/sdd /mnt”,移除原本的yum源,添加U盘yum源
#chroot /mnt/sysimage/
#mount  mount /dev/sdd  /mnt
#ls /etc/yum.repos.d/
#mkdir /home/reposbk
#mv  /etc/yum.repos.d/* /home/reposbk
#vi /etc/yum.repos.d/dvd.repo
#cat /etc/yum.repos.d/dvd.repo
[dvd]
name=dvd
baseurl=file:///mnt
enable=1
gpgcheck=0
重新安装kernel
1.注意是重新安装,不是安装,需要执行该命令 “yum reinstall kernel -y”
由于我们内核所在分区已经被删除所以我们需要从新安装内核 内核在boot 目录下 这时候你进去 boot 目录下会发现是空的
注:要重新安装内核,实际上您必须先将其删除,然后再重新安装。您可以删除当前正在运行的内核,因为它完全可以从内存中运行,并且在尝试重新安装内核时不依赖于物理文件。因此,首先找出您的当前版本。
rpm -q centos-release 查看centos 版本
#uname -r 查看内核版本
rpm -qa | grep kernel | sort 列出已经安装的内核
重新安装内核
yum reinstall kernel
如果你不小心在连网的情况下执行了 yum update -y 也没关系 不会损坏已有的数据 不过会有系统损坏的风险
在硬盘中创建一个boot 分区并将lvm 中的boot 数据移到哪里(boot 分区不能再lvm 中)
注:boot 分区我是已经创建完成的 这个教程你的根据你的实际情况操作
Creating and Migrating to new /boot partition
1. Check if you have free space in LVM
# lvs
LV VG Attr LSize Pool Origin Data% Meta% Move Log Cpy%Sync Convert
root cl -wi-ao—- 17.00g
swap cl -wi-ao—- 2.00g
# vgs
VG #PV #LV #SN Attr VSize VFree
cl 1 2 0 wz–n- 19.00g 10.00g
2. Create a new logical volume of 500MB size. You can create a larger size volume as well, but it should not be less than 500MB.
# lvcreate -L 500M -n /dev/cl/boot
Rounding up size to full physical extent 512.00 MB
Logical volume “boot” created
3. Create a new ext4 filesystem on the logical volume you have just created.
# mkfs.ext4 /dev/cl/boot
mke4fs 1.41.12 (17-May-2010)
Filesystem label=
OS type: Linux
Block size=4096 (log=2)
Fragment size=4096 (log=2)
Stride=0 blocks, Stripe width=0 blocks
32768 inodes, 131072 blocks
6553 blocks (5.00%) reserved for the super user
First data block=0
Maximum filesystem blocks=134217728
4 block groups
32768 blocks per group, 32768 fragments per group
8192 inodes per group
Superblock backups stored on blocks:
32768, 98304

Writing inode tables: done
Creating journal (4096 blocks): done
Writing superblocks and filesystem accounting information: done
This filesystem will be automatically checked every 37 mounts or
180 days, whichever comes first. Use tune4fs -c or -i to override.
4. Create a temporary directory to mount the new boot logical volume.
# mkdir /new-boot
5. Mount the new LV on that directory.
# mount -t ext4 /dev/cl/boot /new-boot/
6. Copy all the files under /boot to this new boot directory. Make sure you use ‘-p‘ to preserve the permission
# cp -rp /boot/* /new-boot/
7. Add an entry in /etc/fstab for the new LV mounted to /boot partition. We
/dev/cl/boot /boot ext4 defaults 0 0
8. Unmount the actual /boot partition (if mounted separately) and then remove the folder.
# umount -l /boot
# rmdir /boot/
9. Create a new /boot folder so that after reboot it will mount the new LV.
# mkdir /boot
10. Reboot the server.
# shutdown -r now
安装GRUB
介绍
么是GRUB 分区结构:GPT
GNU GRUB(GRand Unified Bootloader简称“GRUB”)是一个来自GNU项目的多操作系统引导启动程序。GRUB是多启动规范的实现,它允许用户可以在计算机内同时拥有多个操作系统,并在计算机启动时选择希望运行的操作系统。GRUB可用于选择操作系统分区上的不同内核,也可用于向这些内核传递启动参数。
当/etc/grub2/中的grub.cfg文件丢失或损坏后,开机后因文件丢失则无法正确引导启动操作系统。那么在这种情况下,依然可以通过GRUB来手动引导启动操作系统。以下将在虚拟机中RHEL7.0的环境中来模式实现。
GURB的引导过程
查看 /boot/grub2/grub.cfg 可以看到GRUB中,在选中菜单后是如何启动系统的,如下:
### BEGIN /etc/grub.d/10_linux ###
menuentry 'Red Hat Enterprise Linux Server, with Linux 3.10.0-123.el7.x86_64' --class red --class gnu-linux --class gnu --class os --unrestricted $menuentry_id_option 'gnulinux-3.10.0-123.el7.x86_64-advanced-e9bd41c7-f4e9-46e7-951b-677850232bcc' {
        load_video
        set gfxpayload=keep
        insmod gzio
        insmod part_msdos
        insmod xfs
        set root='hd0,msdos1'
        if [ x$feature_platform_search_hint = xy ]; then
          search --no-floppy --fs-uuid --set=root --hint-bios=hd0,msdos1 --hint-efi=hd0,msdos1 --hint-baremetal=ahci0,msdos1 --hint='hd0,msdos1'  ee0abc65-4eeb-4e20-92b0-1c04a8e8691d
        else
          search --no-floppy --fs-uuid --set=root ee0abc65-4eeb-4e20-92b0-1c04a8e8691d
        fi
        linux16 /vmlinuz-3.10.0-123.el7.x86_64 root=UUID=e9bd41c7-f4e9-46e7-951b-677850232bcc rord.lvm.lv=rhel/root crashkernel=auto  rd.lvm.lv=rhel/swap vconsole.font=latarcyrheb-sun16 vconsole.keymap=us rhgb quiet LANG=en_US.UTF-8
        initrd16 /initramfs-3.10.0-123.el7.x86_64.img
}
以上可以看出,当在GRUB中选中一个系统并回车确定后,可以看到GRUB做了以下4个主要步骤:
1.给root先赋予一个初始值;
2.挂载内核,并再次对root赋值为真实的根分区;
3.加载驱动;
4.boot引导;
手动引导
重启之后进入到GRUB的命令提示符,按照以上GRUB的启动步骤,直接输入以下命令:
grub>set root=(hd0,msdos1)
grub>linux16 /vmlinuz-3.10.0-123.el7.x86_64 root=/dev/mapper/rhel-root ro
grub>initrd16 /initramfs-3.10.0-123.el7.x86.64.img
grub>boot
回车确认后,BRUB就开始启动系统了。
在上面过程中,加载的内核和驱动其实都是在/boot/目录中的内核文件和驱动文件,在输入过程中可以通过TAB键补全。
# cd /sbin
执行grub2 安装命令
// 重新安装 grub 到 sdb, 根据 ls /dev/sd* 的结果,替换成你自己的硬盘
#grub2-install –boot-directory=/boot /dev/sdb
#grub2-mkconfig>/boot/grub2/grub.cfg
GPT分区表下安装grub2报错
错误一
grub-install: warning: File system `ext2′ doesn’t support embedding.
grub-install: error: embedding is not possible, but this is required for cross-disk install.
解决方案是在需要安装grub文件的分区上安装该分区,然后–boot-directory使用Linux安装路径将grub安装到磁盘上,并选择指向该分区中的文件夹的选项。
错误二
grub – install:警告:此GPT分区标签不包含BIOS引导分区;嵌入赢得’ T为可能。
grub- install:错误:无法嵌入,但这是跨磁盘安装所必需的
或这个错误
Installing for i386-pc platform.
grub-install: warning: this GPT partition label contains no BIOS Boot Partition; embedding won’t be possible.
grub-install: error: embedding is not possible, but this is required for cross-disk install.
root @ fwhlin:/ mnt#grub- 安装 / dev / sdb为 i386- pc平台
安装。
grub – install:警告:此GPT分区标签不包含BIOS引导分区;嵌入赢得’ T为可能。
grub- install:错误:无法嵌入,但这是跨磁盘安装所必需的。
根@ fwhlin: / mnt#
复制代码
通过在2 TB硬盘上创建2 MB分区并将其标志设置为“ bios_grub”来解决此问题。
parted /dev/sdb set 1 bios_grub on
这里的“ 1”是2 MB分区的分区号。
root@fwhlin:~# parted /dev/sdb set 1 bios_grub on
Information: You may need to update /etc/fstab.
root@fwhlin:~# parted /dev/sdb print
Model: ATA WDC WD20EZRX-00D (scsi)
Disk /dev/sdb: 2000GB
Sector size (logical/physical): 512B/4096B
Partition Table: gpt
Number Start End Size File system Name Flags
1 17.4kB 3049kB 3032kB ext4 bios_grub
root@fwhlin:~#
现在,grub-install可以正常工作了。
我将/ dev / sdb设置为BIOS中的第一个引导设备,它可以完美引导。
注:报这个错误的话 grub-install: error: will not proceed with blocklists
#grub2-install –boot-directory=/boot /dev/sdb 这个必须为硬盘 而不是某一个分区 如sdb1 sdb 2 等
Reinstalling grub2 on UEFI-based machines (如果你打算使用UEFI 启动的话)
RHEL7/CentOS 7 – Recover/Reinstall GRUB2 with UEFI(使用uefi 启动)
1. Boot the system using RHEL/CentOS latest DVD.
2. Once the system is booted from DVD, select “Troubleshooting” – > Select Rescue a Redhat Enterprise Linux.

Rescue a Red Hat Enterprise Linux
3. Select Continue to mount the image under /mnt/sysimage.
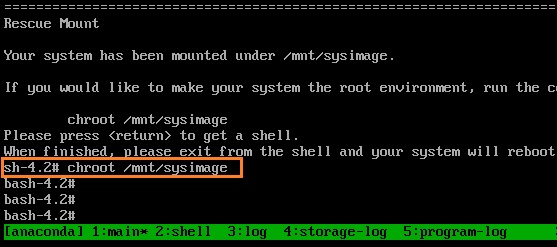
Continue – Rescue Mode – RHEL
4. chroot to the OS image.

chroot to OS Image – RHEL
5. Tried to list the EFI contents from the boot partition. Here, efi directory looks empty.
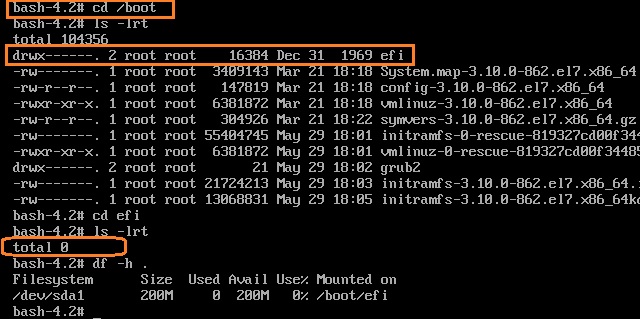
List the EFI directory contents
6. Let’s restore the GRUB2 by re-installing grub2-efi and shim packages.
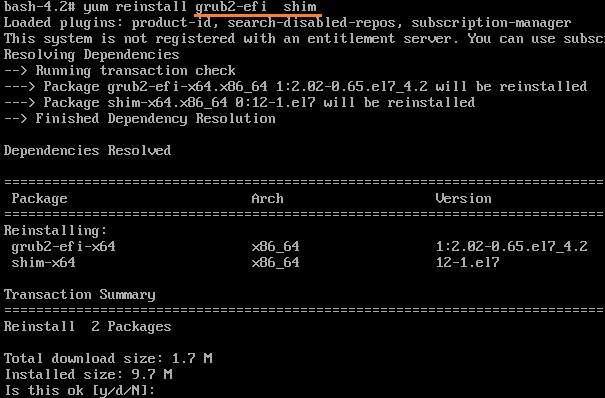
Reinstall grub2-efi and shim
In Rescue mode, your system may not be able to communicate with the network. You could quickly configure local repo using the booted DVD like below if you need repo.

mount the DVD and configure REPO
7. Once the packages are reinstalled, please navigate to the “efi” directory and check it’s content.
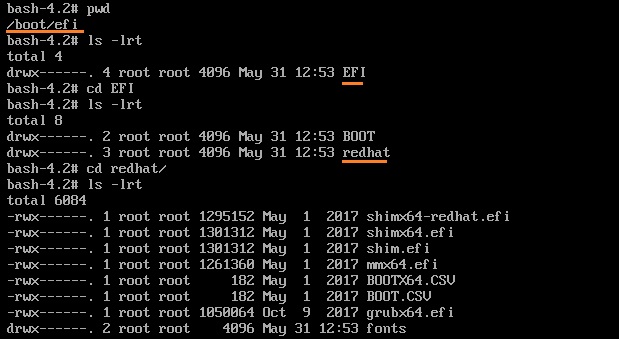
efi directory restored – GRUB2
8. Regenerate the grub.cfg file.

Restore grub.cfg
9. If SELINUX is enabled on the system, please create the “autorelabel” file.

一些操作与引用
挂载gpt分区
1.首先查看系统磁盘信息:
fdisk -l
2.找到移动硬盘对应盘符,如:sdb 查看分区信息
再执行:
parted /dev/sdb print
3.挂载到指定目录即可:
sudo mount –t ntfs /dev/sdb2 /home/6T
mount -t ext4 /dev/mapper/VolGroup00-LogVol02 /foo
centos7配置网络nmcli无法使用 系统正常的情况下
Error: Could not create NMClient object: GDBus.Error:org.freedesktop.DBus.Error.UnknownMethod: Method “GetManagedObjects” with signature “” on interface “org.freedesktop.DBus.ObjectManager” doesn’t exist
1、 systemctl status NetworkManager
2、systemctl restart NetworkManager
或者systemctl stop NetworkManager/systemctl start NetworkManager
3、再执行nmcli con show或者nmcli device show就ok了
4、nmcli con add type ethernet con-name static2 ifname enp0s3 ip4 192.168.1.50/24 gw4 192.168.1.1
5、nmcli con mod static2 ipv4.dns “8.8.8.8 8.8.4.4”
6、nmcli con down static1 ; nmcli con up static2
7、nmcli con mod home +ipv4.addresses 10.1.114.114/24
8、Warning: nmcli (1.0.6) and NetworkManager (1.0.0) versions don’t match. Use –nocheck to suppress the warning.
yum -y update会升级NetworkManager的(包含nmcli)
rpm -qf /usr/bin/nmcli
NetworkManager-1.8.0-9.el7.x86_64
nmcli -v
nmcli tool, version 1.8.0-9.el7
引用与参考
CHAPTER 36. BASIC SYSTEM RECOVERY
转载请注明:(●--●) Hello.My Weicot » Centos 恢复被删除的引导分区 boot 分区的救援以及恢复方式
